Laminate flooring is a popular choice for homeowners looking for an affordable and attractive alternative to traditional hardwood floors. Not only is laminate flooring durable and easy to maintain, but it’s also relatively simple to install, even for DIY enthusiasts. This comprehensive guide will walk you through the entire process of installing laminate flooring, from preparation to the finishing touches. By following these steps, you’ll be able to achieve professional-looking results in your home.
Understanding Laminate Flooring
Laminate flooring is composed of multiple layers of synthetic material, fused together through a lamination process. The top layer features a photographic applique layer that simulates the look of wood, stone, or other natural materials. Beneath this is a core layer of high-density fiberboard (HDF) or medium-density fiberboard (MDF) for stability and strength, and a backing layer for moisture resistance and balance.
Laminate flooring is available in various thicknesses, typically ranging from 7mm to 12mm, and comes in planks of different lengths and widths. One of its main advantages is the ease of installation, often utilizing a click-lock system that allows the planks to snap together without the need for glue or nails.
Tools and Materials Needed
Before you begin the installation, gather the necessary tools and materials:
Tools:
- Measuring tape
- Chalk line
- Carpenter’s square
- Utility knife
- Saw (circular saw, jigsaw, or miter saw)
- Rubber mallet
- Tapping block
- Pull bar
- Spacers
- Safety goggles
- Dust mask
- Knee pads
- Pencil
Materials:
- Laminate flooring planks
- Underlayment (if not pre-attached)
- Moisture barrier (if needed)
- Transition strips (for doorways and thresholds)
- Baseboards or quarter round molding
- Adhesive (if specified by the manufacturer)
Preparation
Acclimate the Flooring
Acclimation is crucial to ensure that the laminate flooring adjusts to the temperature and humidity levels of your home, preventing expansion or contraction after installation.
- Bring the Flooring Indoors: Place the unopened boxes of laminate flooring in the room where it will be installed for at least 48 hours.
- Maintain Room Conditions: Keep the room temperature between 65°F and 85°F (18°C to 29°C) and the relative humidity between 35% and 65% during this period.
Prepare the Subfloor
A properly prepared subfloor is essential for a successful installation.
- Clean the Subfloor: Remove any debris, dirt, or old adhesive from the subfloor.
- Check for Level: Use a carpenter’s square or level to ensure the subfloor is even. Sand down high spots and fill low spots with a leveling compound if necessary.
- Moisture Barrier: If installing over concrete or in a moisture-prone area, lay down a moisture barrier according to the manufacturer’s instructions.
Gather Necessary Tools
Ensure all tools and materials are within reach before starting the installation process. This will save time and make the installation smoother.
Installation Process
Step 1: Measure and Plan
- Measure the Room: Calculate the square footage of the room by multiplying the length by the width. Add an extra 10% to account for cuts and waste.
- Plan the Layout: Determine the direction of the flooring. Typically, it is best to lay the planks parallel to the longest wall or the main light source.
- Mark the Starting Line: Use a chalk line to mark the starting line, leaving an expansion gap (usually 1/4 to 3/8 inch) around the perimeter of the room.
Step 2: Install Underlayment
- Roll Out the Underlayment: Lay the underlayment perpendicular to the direction of the flooring planks. Ensure the edges butt together but do not overlap.
- Trim the Edges: Use a utility knife to trim the underlayment to fit around obstacles and along walls.
Step 3: Lay the First Row
- Choose the Starting Wall: Begin laying the planks along the longest wall, ensuring the first row is straight and the planks’ tongues face the wall.
- Cut the First Plank: Trim the tongue off the first plank to create a clean edge.
- Place Spacers: Insert spacers between the plank and the wall to maintain the expansion gap.
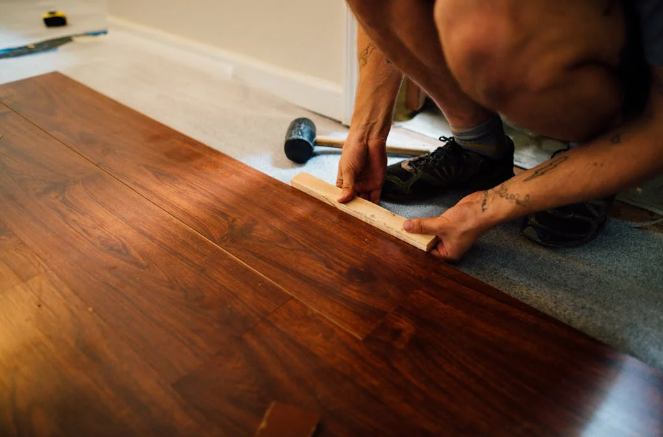
- Connect the Planks: Use the click-lock mechanism to join the planks together, tapping gently with a rubber mallet and tapping block if needed.
Step 4: Continue Laying Rows
- Stagger the Joints: Offset the joints by at least 12 inches from row to row for a more natural look and added stability.
- Cut to Fit: Measure and cut the end planks of each row as needed, using a saw.
- Install Rows: Continue installing planks row by row, ensuring each plank locks securely into place.
Step 5: Fit the Last Row
- Measure the Last Row: Measure the width needed for the final row, accounting for the expansion gap.
- Rip the Planks: Cut the planks lengthwise to fit the space.
- Install the Last Row: Use a pull bar to snugly fit the final row into place.
Finishing Touches
Install Baseboards and Molding
- Remove Spacers: Once the flooring is installed, remove all spacers.
- Install Baseboards: Attach baseboards or quarter round molding to the walls, covering the expansion gap. Nail the baseboards to the wall, not the flooring, to allow for movement.
Clean and Inspect
- Clean the Floor: Sweep or vacuum the floor to remove any debris. Wipe down with a damp cloth if necessary.
- Inspect the Installation: Check for any gaps, loose planks, or other issues. Address any problems immediately.
Maintenance Tips
- Regular Cleaning: Sweep or vacuum regularly to remove dust and debris. Use a damp mop for deeper cleaning, avoiding excessive water.
- Protect the Floor: Use felt pads under furniture legs to prevent scratches. Place rugs or mats at entryways to reduce dirt and moisture.
- Avoid Moisture: Clean up spills immediately to prevent water damage. Avoid using steam cleaners or wet mops.
Common Mistakes to Avoid
- Skipping Acclimation: Failing to acclimate the flooring can lead to expansion or contraction issues.
- Improper Subfloor Preparation: An uneven or dirty subfloor can cause the planks to not lock properly or become damaged.
- Neglecting the Expansion Gap: Without a proper expansion gap, the flooring can buckle or warp over time.
- Incorrect Use of Tools: Using the wrong tools or techniques can damage the planks or result in a poor installation.
FAQs
Q1: Can I install laminate flooring over existing flooring?
Yes, laminate flooring can be installed over most existing floors, including vinyl, tile, and hardwood, provided the subfloor is clean, dry, and level.
Q2: How do I handle transitions between rooms?
Use transition strips to bridge the gap between different types of flooring or to cover expansion gaps at doorways.
Q3: What if my laminate flooring gets wet?
Laminate flooring is resistant to moisture but not waterproof. Clean up spills immediately to prevent damage. In case of significant water exposure, such as flooding, the affected planks may need to be replaced.
Q4: Can I install laminate flooring in bathrooms or kitchens?
Yes, but ensure that the laminate flooring is designed for high-moisture areas and take extra precautions to seal the edges and use moisture barriers.
Q5: How long does laminate flooring last?
With proper care and maintenance, laminate flooring can last 15-25 years. The lifespan may vary based on the quality of the flooring and the level of foot traffic.
By following this step-by-step guide, you can successfully install laminate flooring in your home, enhancing its beauty and functionality. Remember to take your time, follow the manufacturer’s instructions, and enjoy the process of transforming your space with your new laminate floor.